This post is also available in:
I use the Thule RoundTrip Pro flight case for my trips by plane. It has always gone well so far. My bike has not suffered any damage yet. Only the suitcase.
On the return journey from Málaga to Dresden I photographed the individual steps of the transport. With those pictures I present the preparation of the bike for the transport.
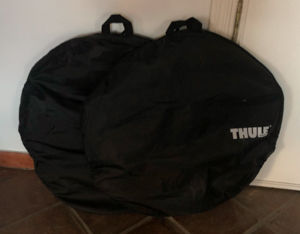
Bike suitcase
I bought my Thule Roundtrip Pro bike case in January 2016 from Stadler on the internet. Currently the newer model Thule Roundtrip Pro XT is on the market.
The Thule Roundtrip Pro is built over a stable tub made of hard plastic. The top is made of soft nylon. Therefore, the soft sides are reinforced with foldable and removable side panels. This concept allows that the suitcase saves space when stowed away . The bike wheels are additionally protected by two padded bags.
Special feature of the Thule Roundtrip Pro is an integrated assembly stand. This is very convenient for preparing the bike for transport. And also to assemble it after transport. The legs of the mounting stand serve as additional reinforcement of the sidewalls of the suitcase.
The RoundTrip Pro has two integrated wheels on the bottom. On the opposite side a handle is attached. With this the wheel case is easy to move. Of course it is more power consuming than with four wheels. But as it is you can get through everywhere.
Tools and supporting devices
- Allen key sizes 4, 5 and 8
- Torque wrench to tighten the bolts on saddle and handlebar
- Assembly paste for tighten the saddle (only required with carbon seat post)
- Grease for the screw connections
- Edge protection profiles
- Bubble wrap
- Duct tape
- Velcro fasteners
Preparation

- First, you prepare the suitcase. To do this, push the side panels into the case.
- Then you set up the integrated stand.

- The front wheel is the first to dismantle. The wheel is attached to the mounting stand with a quick release at the fork.
- The bike is furthermore attached with a strap above the bottom bracket. Ready to go.
Dismantling
- Next step is the disassembly of the gear shift on the derailleur hanger. For this you need an Allen key size 6 mm.

- Then you remove the saddle including seat post. On my bike you need an Allen key size 4 mm for it.
- Next, you dismantle the handlebars. On my bike gain with an Allen key size 4 mm.
- Finally you have to take down the rear wheel. To unscrew my Shimano 105 pedals, I need an Allen key size 8 mm. For newer Shimano pedals this can also be 6 mm.
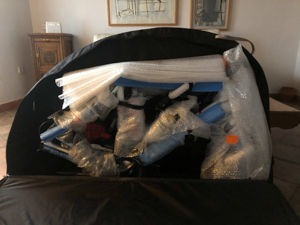
Padding
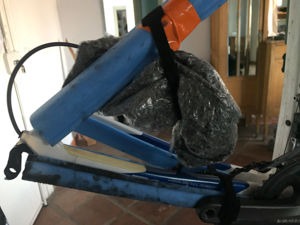
- Then you attach padding to the bike frame. For this I use edge protection profiles, as they are used for picture frames. These are robust and easy to handle. They are available in various sizes in stores for art supplies.
- The gearing you protect with bubble wrap. It is suitable to attach it between the seat stays. For this you could use velcro fasteners and, if necessary, adhesive tape.
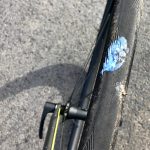
On the picture above the “weak point derailleur hanger” can be seen. A bent derailleur hanger affects the functionality of the gear box. During the first trips I removed the gearing including the derailleur hanger. This is not a good solution. The mounting screws on the derailleur hanger are very small. That’s why the allen is vulnerable. The screws damage quickly. I have not taken a derailleur hanger tool on a journey yet. It’s too big and too heavy for transport.
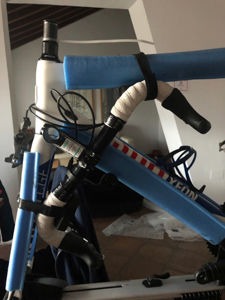
- You attach the handlebars with velcro fastener between top tube and fork. In doing so, I make sure that it’s not sticking out of the frame.
- Then you push a plastic pad under the handlebar attachment. This prevents damaging the frame.
- The brake lever should not stick out unprotected. That’s why I attach it with velcro.

Padding between handlebar and frame Placing of the handle bar on the fork Protection of the brake lever


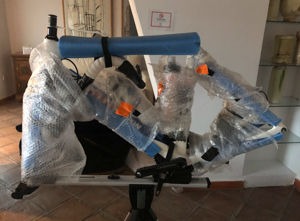
- In the next step, you protect the entire bike with bubble wrap. To attach the foil you use tape.
- Finally, you need to find space for the saddle. I attach it with velcro between the seat posts. It fits in quite well. You only need to pay attention that the gearing and the saddle and the circuit do not get in each other’s way.
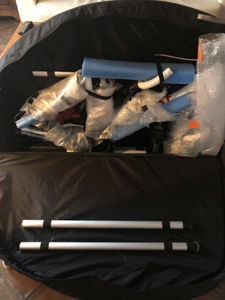
Pack
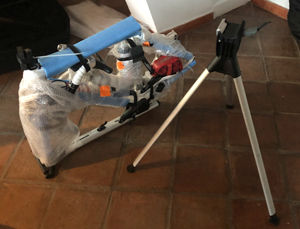
The bike is now prepared for transport. Remove it from the assembly stand together with the mounting rail.
The wheels are stowed in the wheel bags. For this purpose, the quick release is to be removed. They can be stowed in separate pockets in the wheel bags.
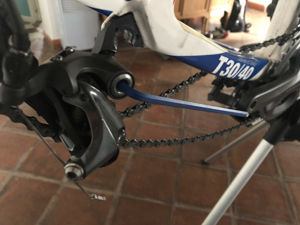
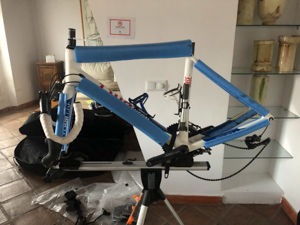
The road bike prepared for transport and the assembly stand The two wheel bags with the packed wheels
- The padded bike is clicked into the tub of the transport bag. It is firmly placed in the bag. Front and top you should additionally with bubble wrap.
- The legs of the assembly stand are pushed into the side walls. They additionally stabilize the sides. The bracket of the mounting stand is locked on the rail in the bag.
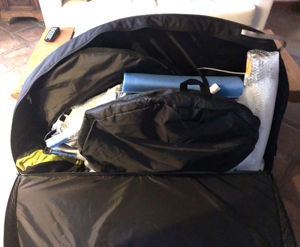
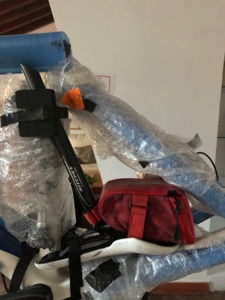
- The wheels find enough space on the sides of the bag. In the picture on the left side, my cycling backpack looks out. Below the rear wheel is enough space for it. In my backpack I stow the necessary tools: pedals, rags, wheel lamps and whatever else I need on the trip.
Weight
I weighed my Thule RoundTip Pro empty at 11 kilograms. Of course, it depends on what you put in it on a trip. But with bike it usually weighs more or less clearly more than 20 kilograms. The usual weight limit of the airlines of 30 or 32 kilograms can be met easily. Unless you travel only with hand luggage. Here, the experience shows that it can become tough sometimes.
Damages
So far my bike didn’t suffer damages. But of course the suitcase suffered some scratches. And in addition the mounting rail broke. This could have happened only from a heavy hit to the bag. However, the bike has survived it without a scratch. And that’s why the suitcase has done its job.
Assembly
At the destination the assembly of the bike has to be done. Mounting of handlebar, saddle, gearing and pedals. And, of course, the wheels.
To assemble and tighten the screw connections, you need a torque wrench. The maximum permissible torque must be strictly observed. Otherwise the bike will be damaged.
For a carbon seat post, it is essential to use carbon paste. This is applied thinly to the seat post. Otherwise the seatpost will not hold.
That’s it. Have fun traveling by plane with your road bike!